





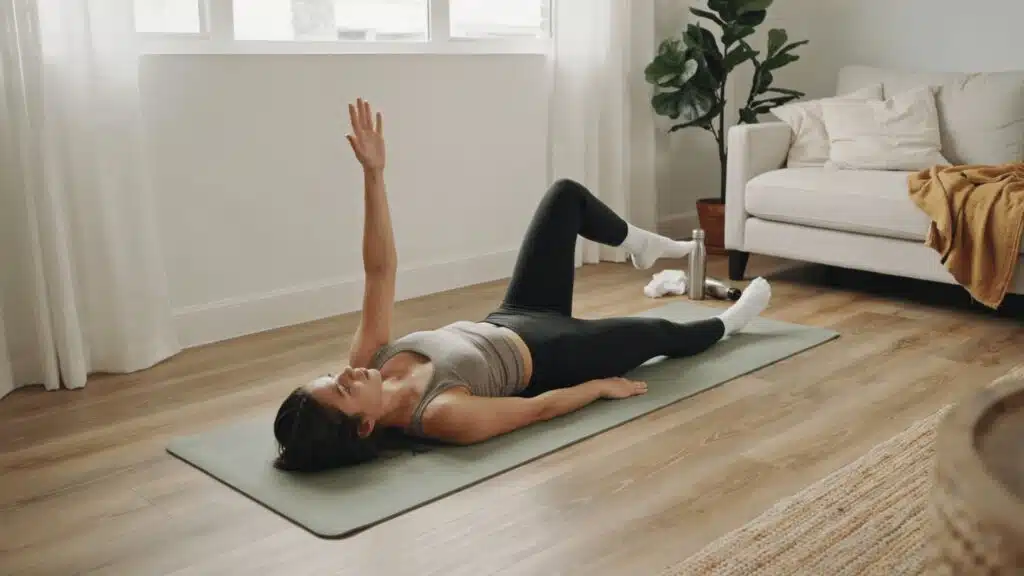
Physical therapists recommended dead bug exercises for patients with lower back issues long before these exercises became popular in gyms. Somewhere along the way, personal trainers noticed and borrowed it.
It now appears in warm-ups, rehab plans, and core routines, with the only common element being this exercise.
So what is a dead bug exercise, and why did it cross over from clinics to gym floors so fast?
The answer lies in how minimally it asks of the body while still requiring genuine control.
No equipment needed, no impact, only a strange name and unexpectedly many results.
What is a Dead Bug Exercise?
The dead bug is a core exercise that prevents extension.
It trains your core to resist movement rather than create it. Your limbs move, but your spine stays still and flat.
This distinguishes it from crunches or planks, which involve holding a static position.
Dead bug challenges stability while limbs are actively moving. Trainers classify it as a contralateral exercise, since opposite arm and leg move together. This pattern mirrors natural movements like walking or climbing stairs.
It’s often an initial exercise in beginner core programs, as it builds control before increasing load or speed.
Why the Dead Bug Exercise is So Effective
Several key mechanics distinguish the dead bug from most other core exercises:
- Trains isometric core control while the limbs move dynamically.
- Prevents repeated spinal flexion, unlike crunches or sit-ups.
- Develops core stability by performing cross-body motions.
- Reflects typical real-world behaviors such as walking and climbing stairs.
- Scales effortlessly by adjusting range of motion, tempo, or load.
- Improves the mind-muscle link by performing slow, controlled repetitions.
- Works well as a warm-up or a standalone core finisher.
How to Do a Dead Bug Exercise
Follow this step-by-step to perform the dead bug exercise correctly and maximize each rep.
Step 1: Get Into Starting Position
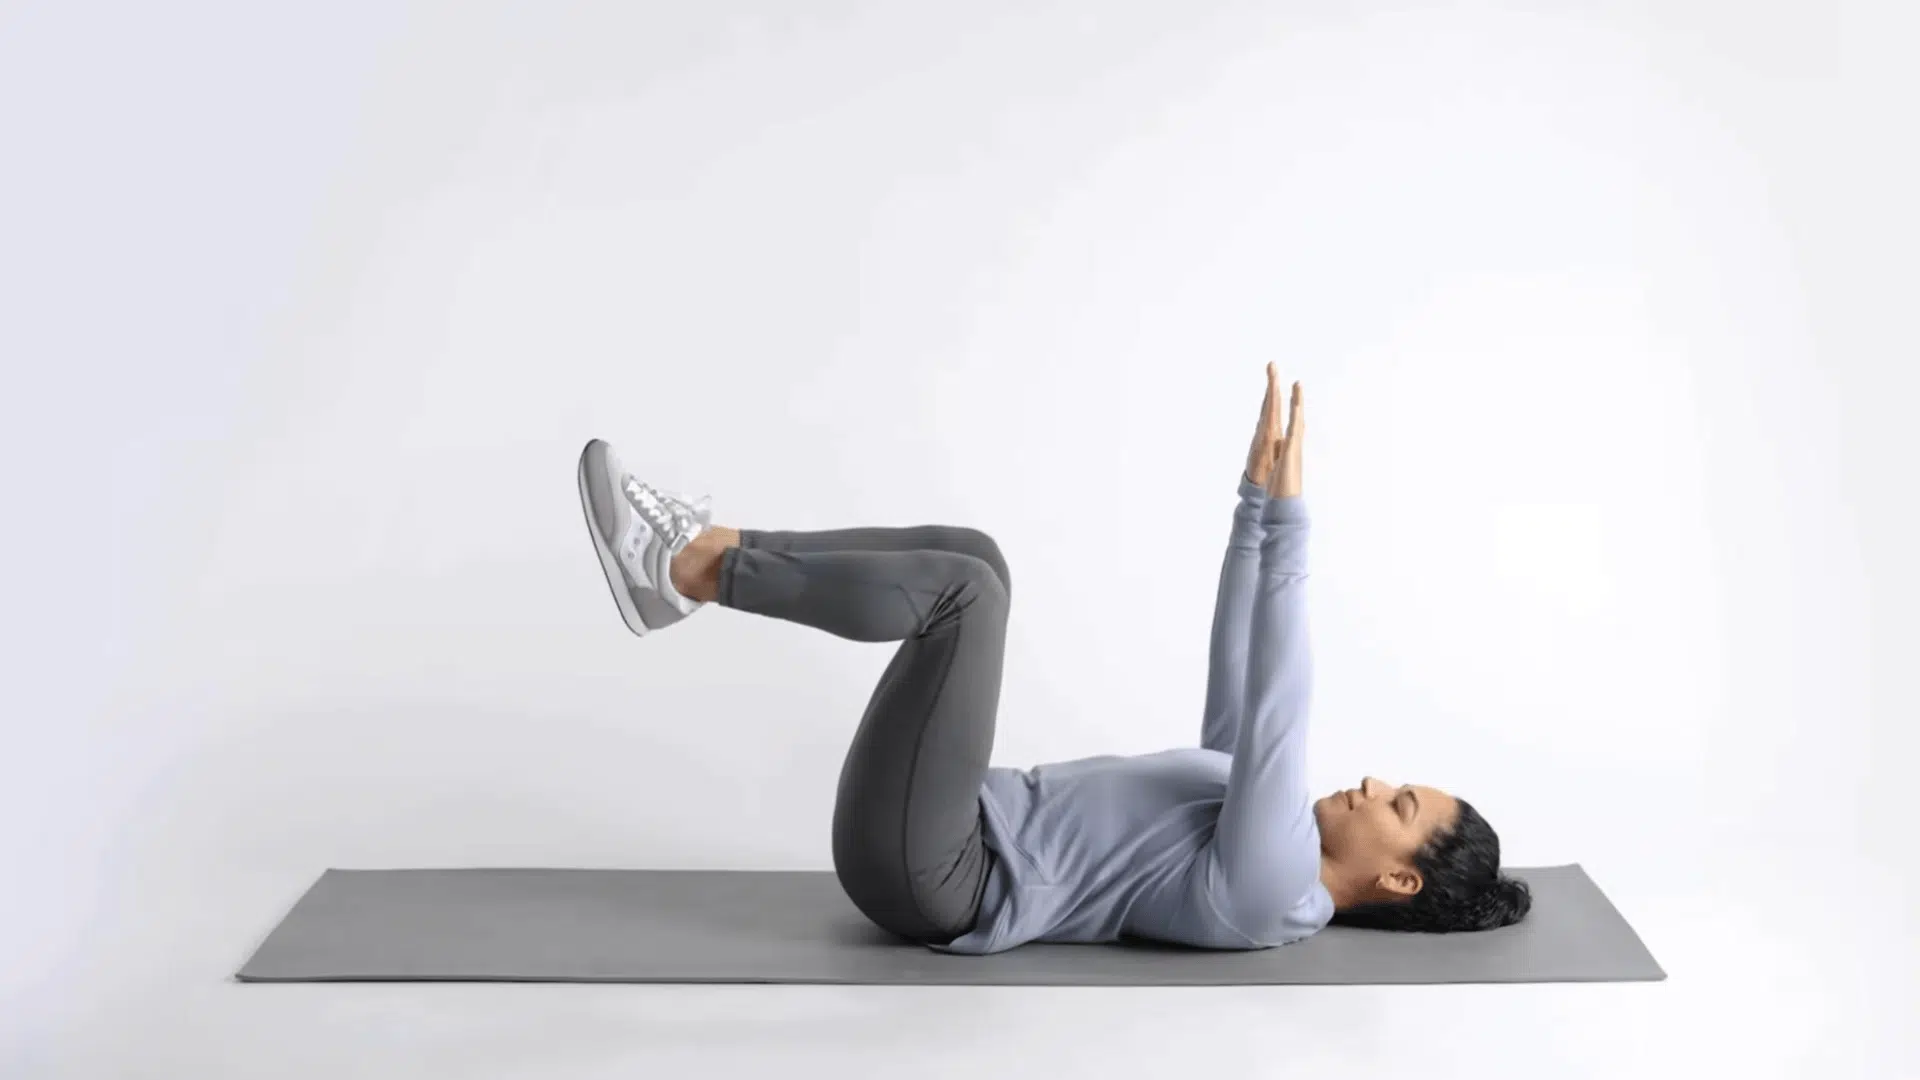
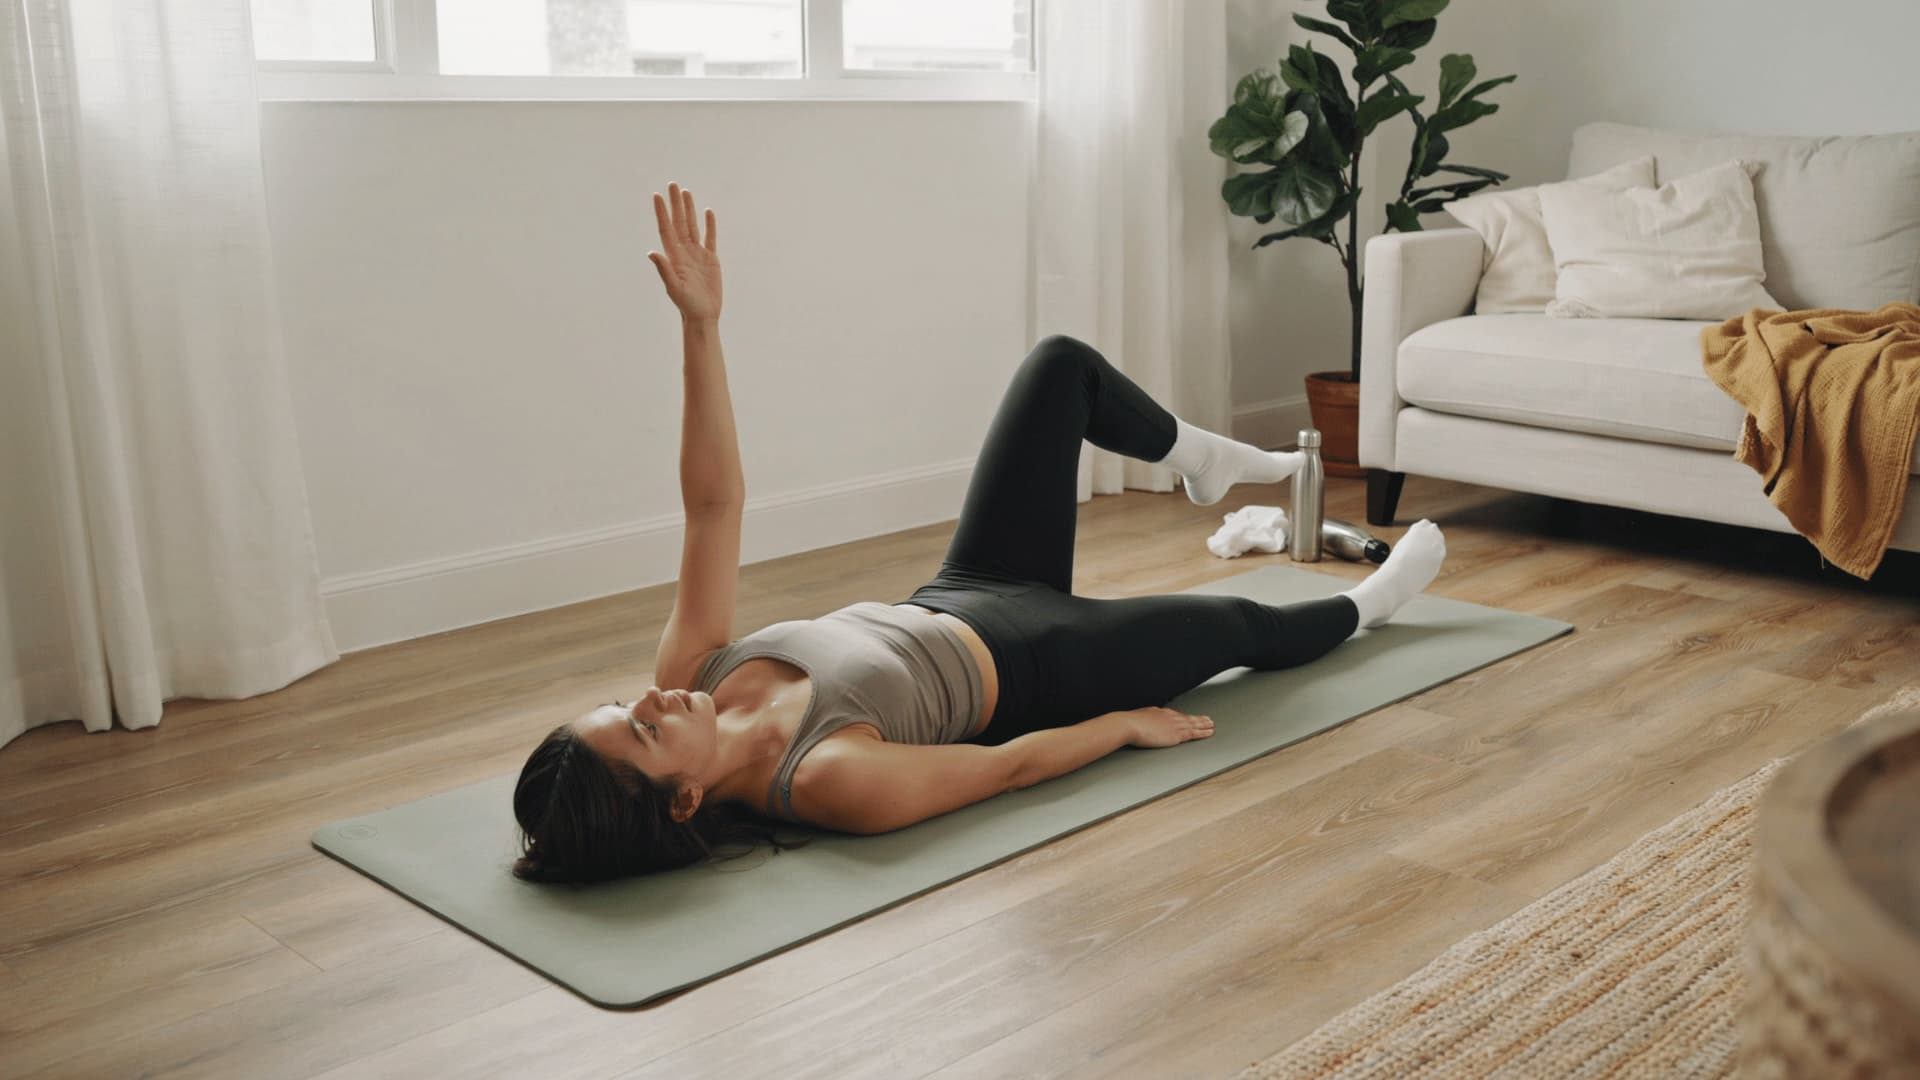
Lie on your back on a yoga mat with your arms reaching straight up toward the ceiling.
Bend your hips and knees to 90 degrees and lift your feet off the floor so your shins stay parallel to the ground.
This tabletop position is where every single rep begins, and it should feel stable and fully controlled before you start moving your arms or legs at all through the exercise.
Step 2: Extend Arm and Opposite Leg
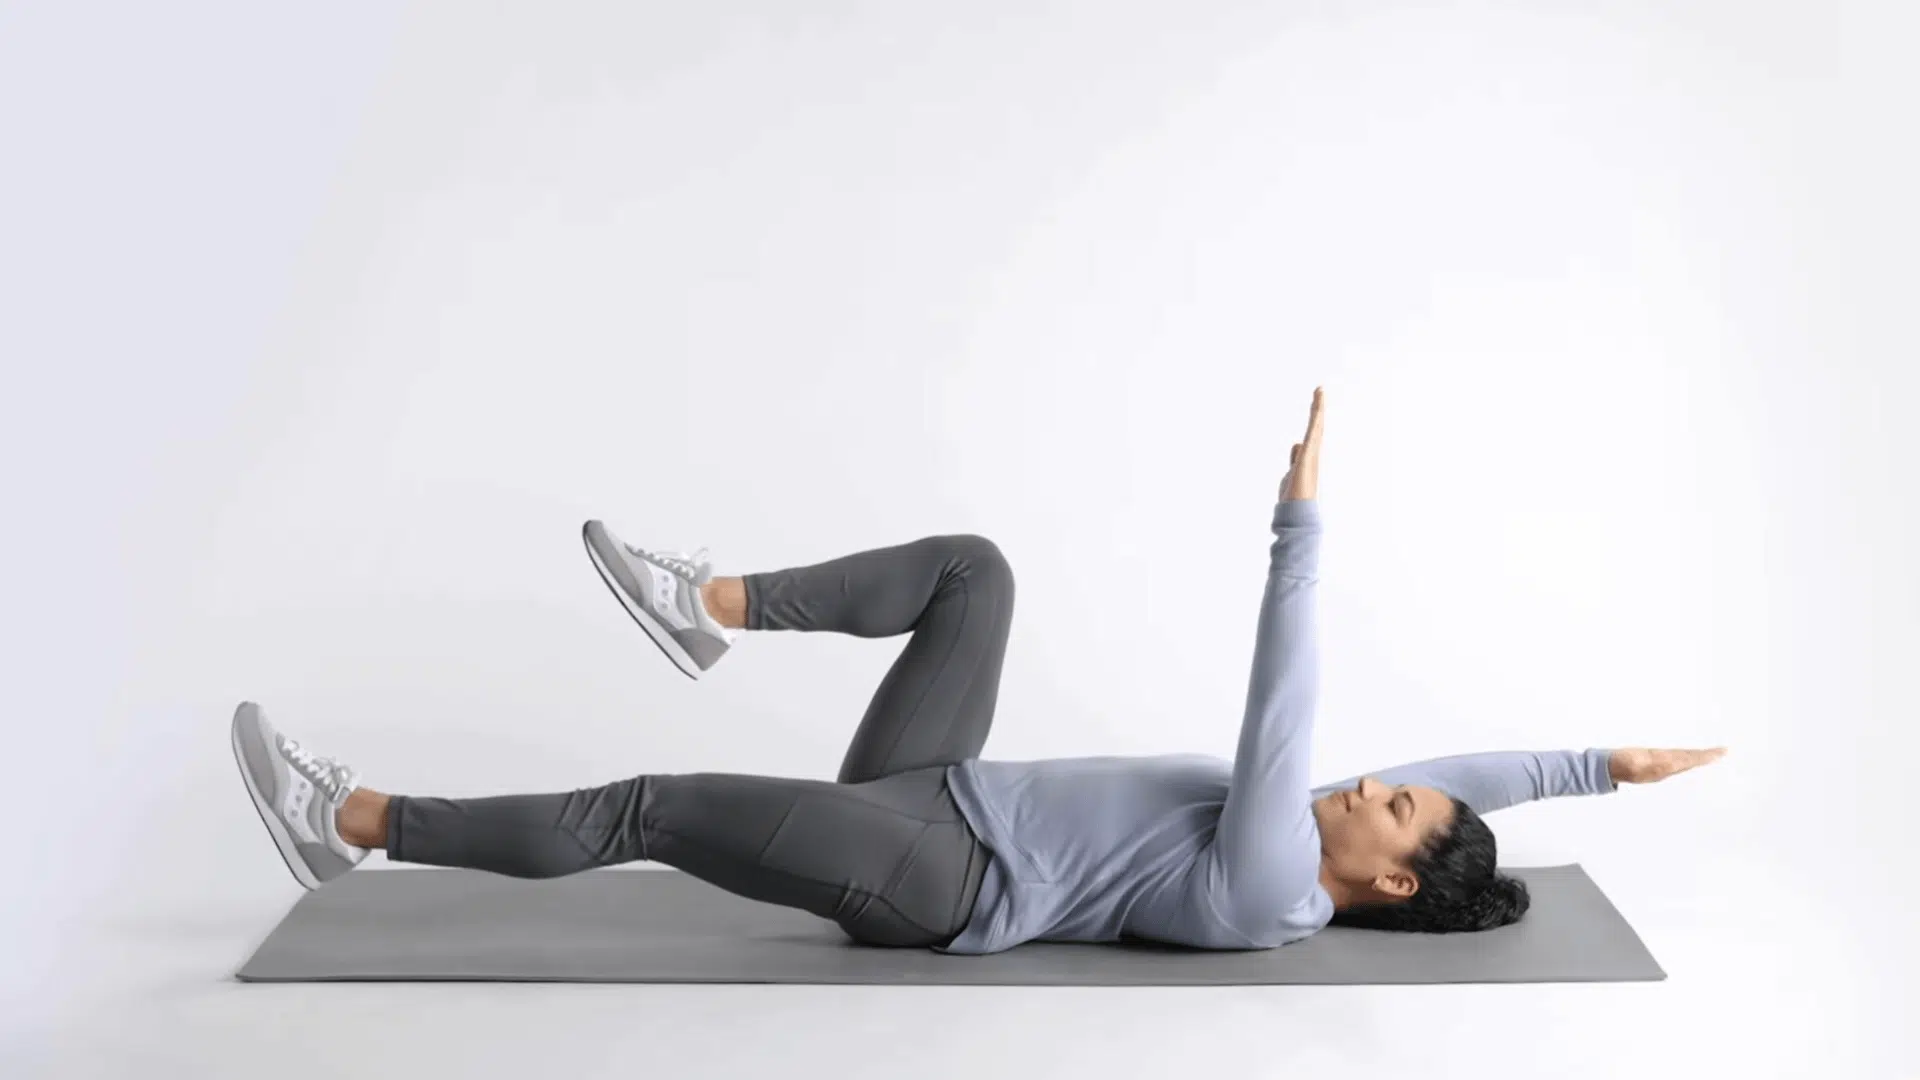
Reach one arm overhead while simultaneously extending your opposite leg straight out in front of your entire body.
Move slowly and with careful control, allowing your hand and leg to hover just a few inches above the floor without ever touching it.
This opposite arm and leg pattern is exactly what makes the dead bug exercise so effective for building coordinated core strength and stability throughout your whole entire body.
Step 3: Return to Starting Position
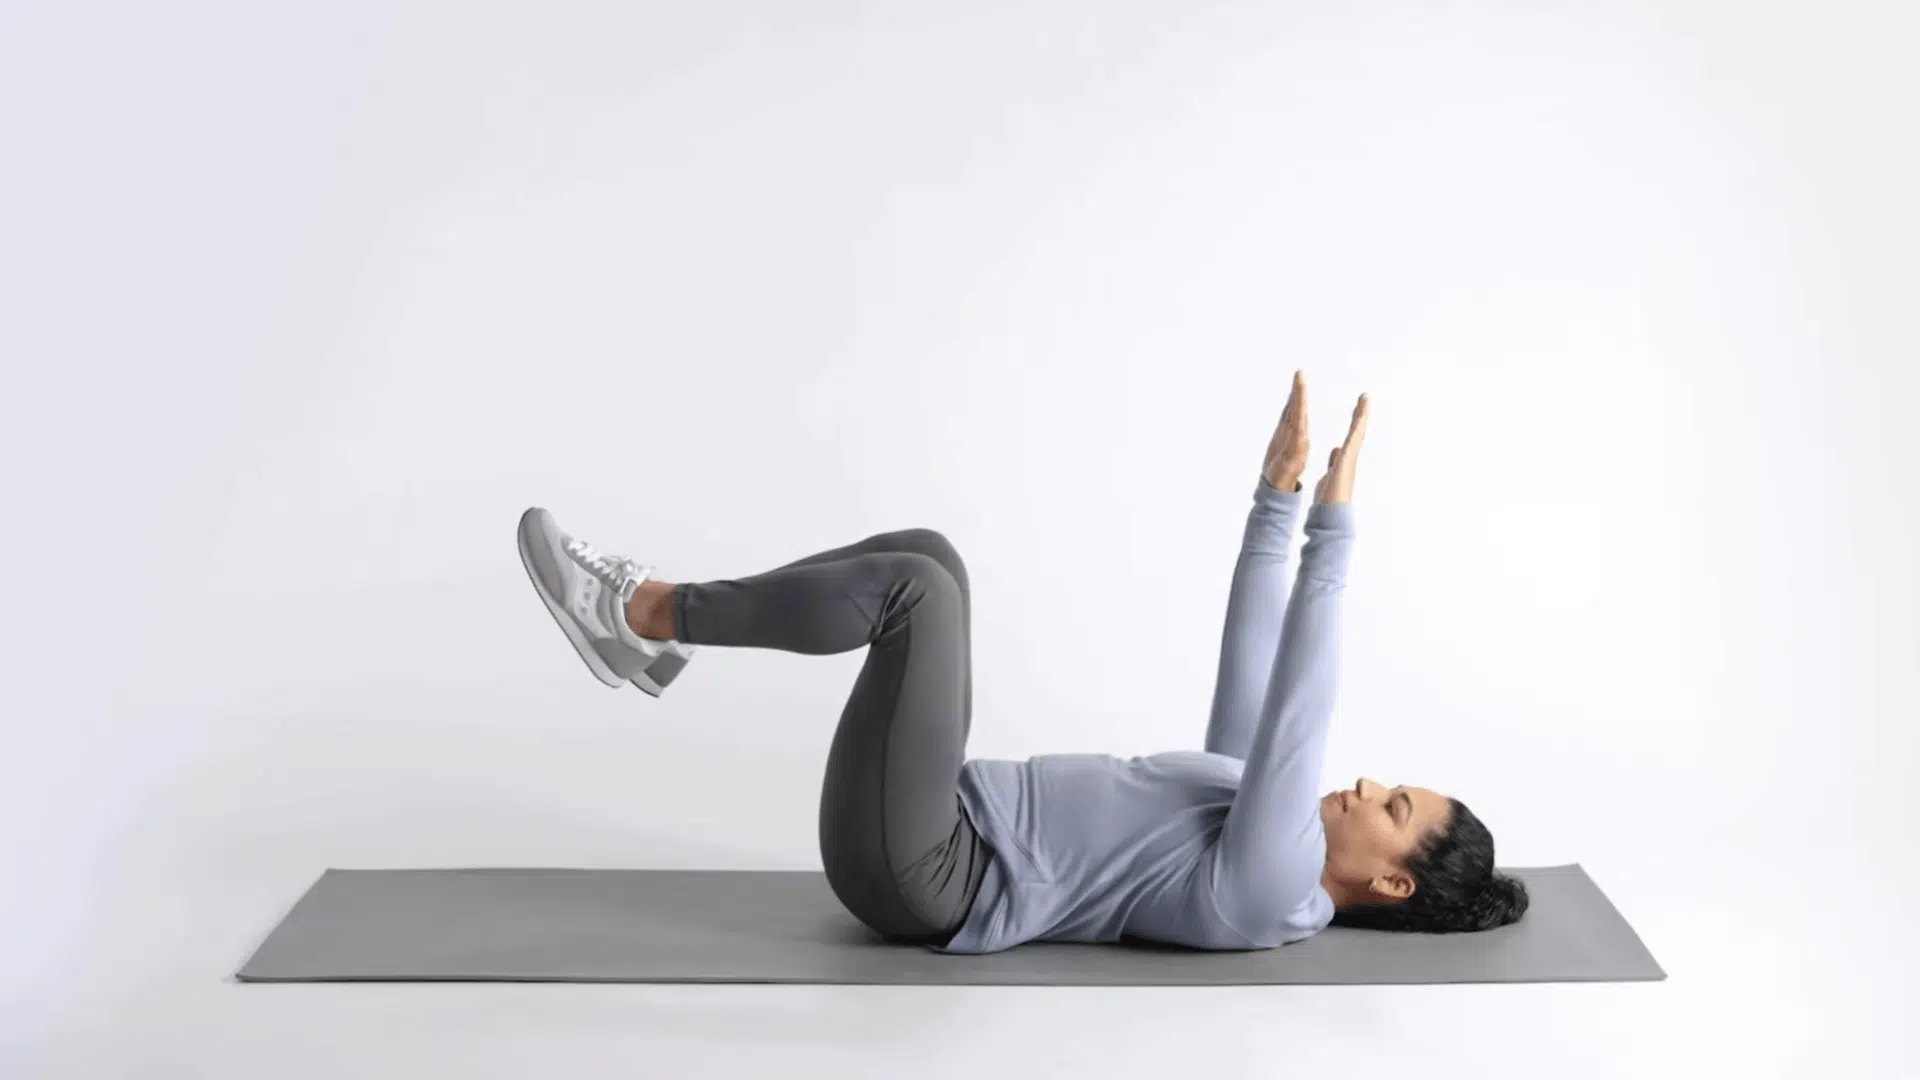
Bring your extended arm and leg back to the starting tabletop position with full and steady control, pausing here for a brief moment before moving on to the other side.
Focus on pressing your entire lower back firmly into the floor instead of arching upward off the mat.
This return checkpoint confirms your core is doing the work correctly and safely before you switch sides.
Step 4: Extend the Opposite Side
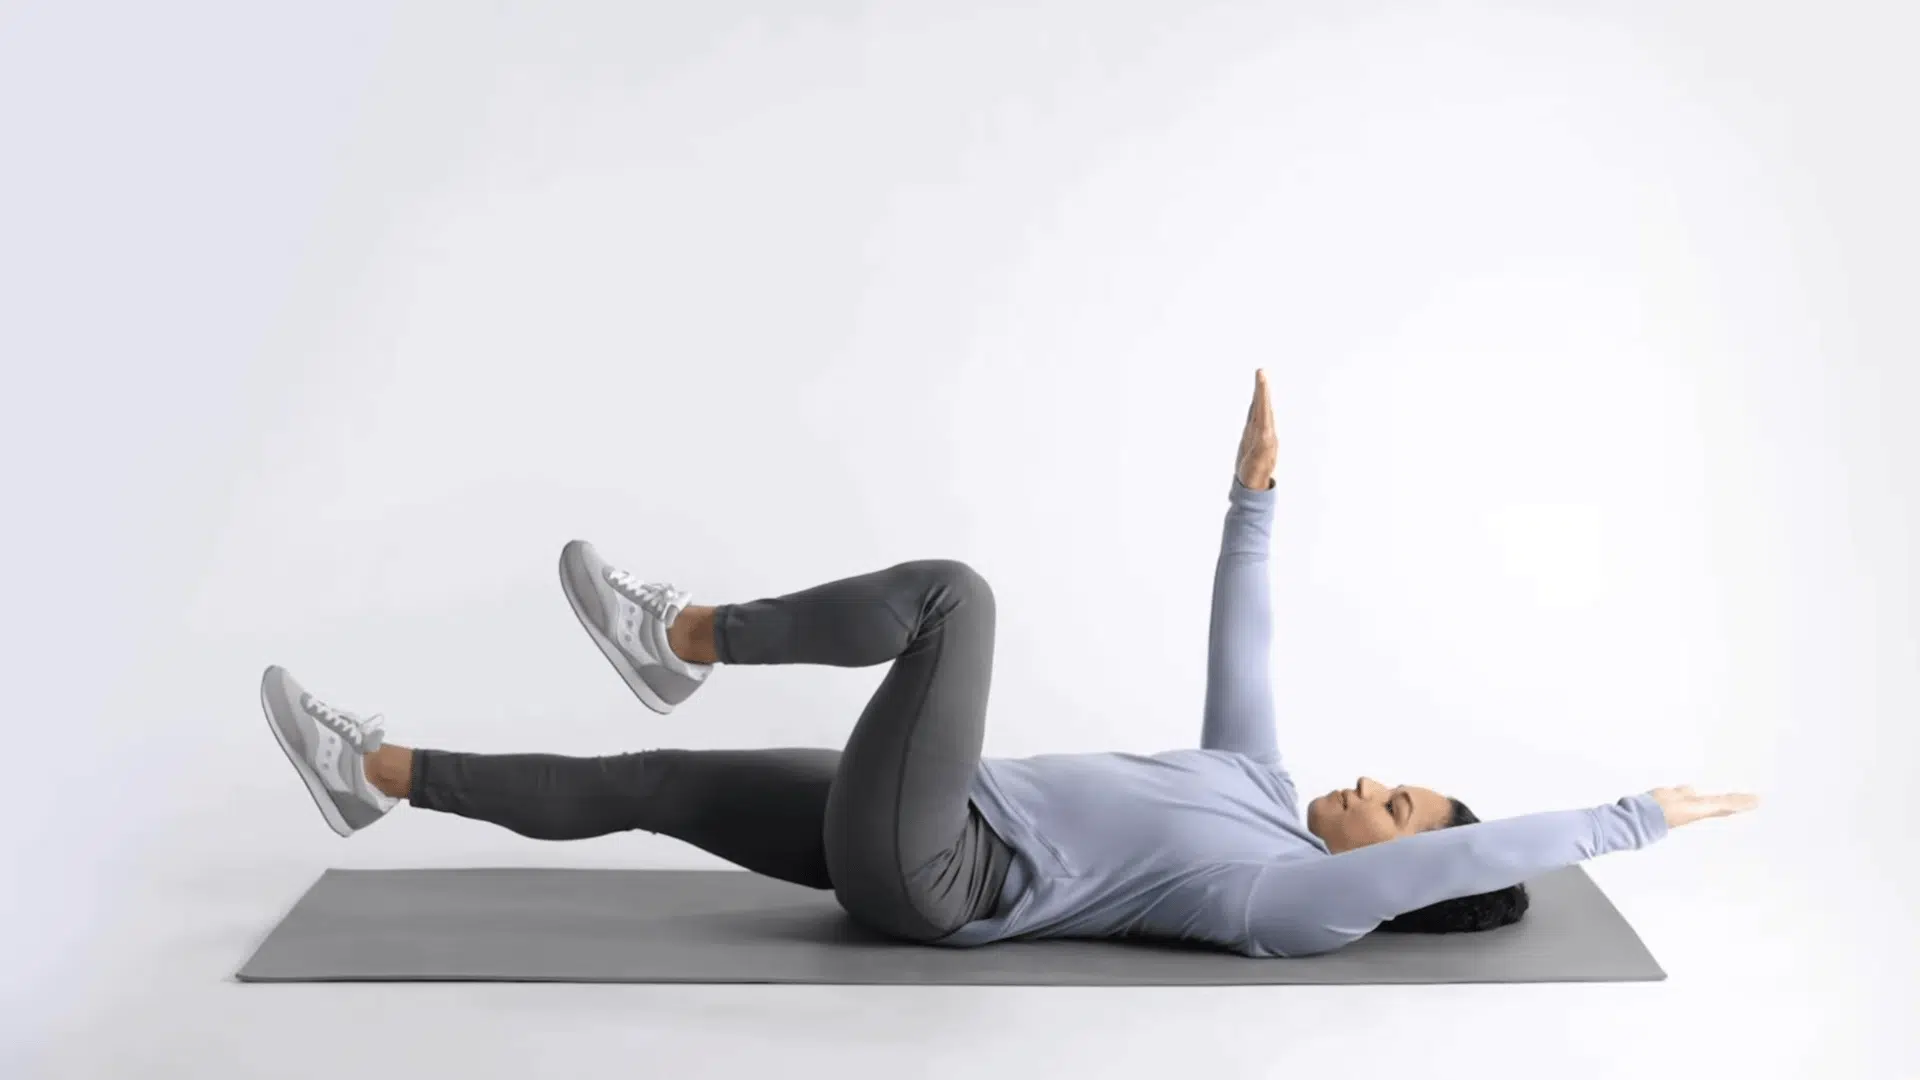
Now reach your other arm overhead while extending your other leg straight out.
Mirror the exact same slow and controlled motion on this new side of your body.
Focus on squeezing your core muscles as you hold this extended position steady, keeping the same controlled pace throughout the entire movement from start to finish.
Alternating sides like this ensures both halves of your core receive equal, balanced work over time.
Step 5: Relax
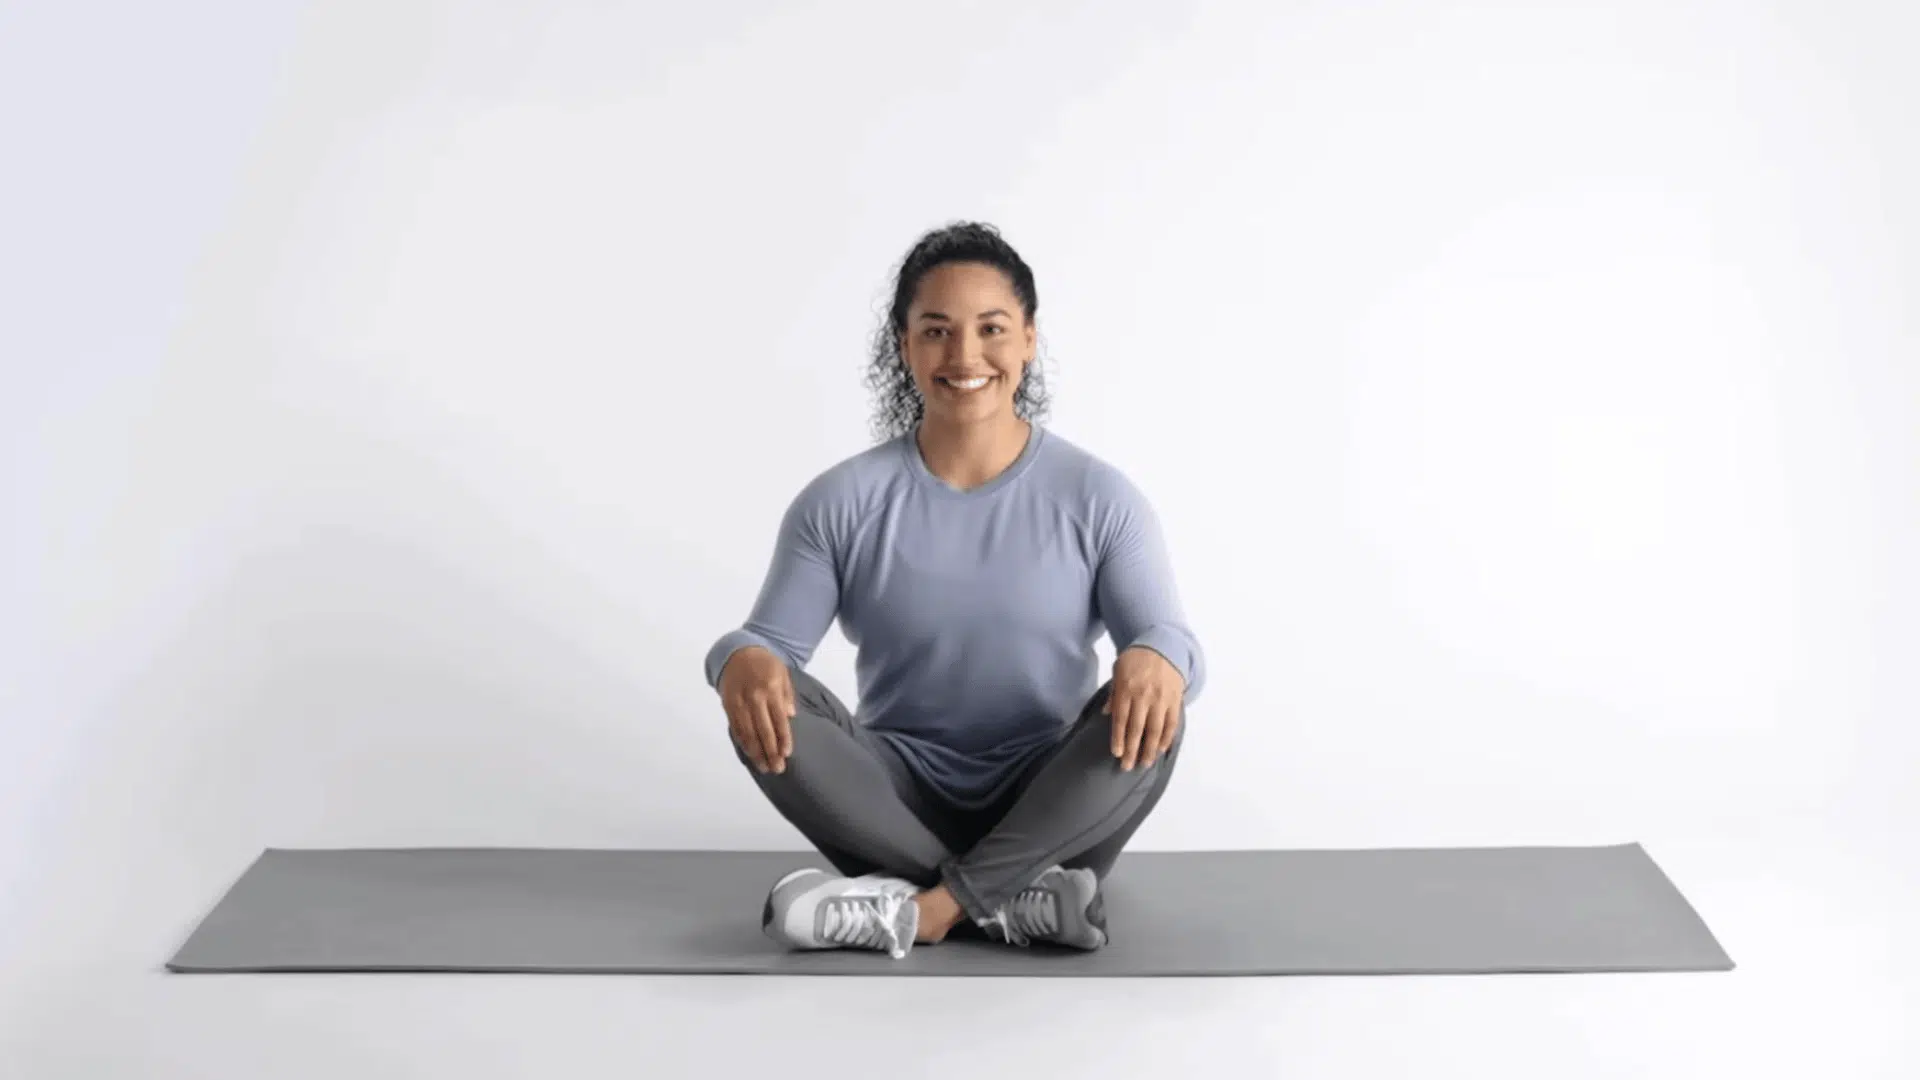
Once all your reps are completed, relax back into the starting position by letting your feet rest lightly near the floor, and your arms settle down at your sides.
Take a moment here before standing up or moving into your next exercise.
Let your core and entire lower back completely relax any tension accumulated during the set.
This relaxed finish signals that your dead bug exercise is complete.
Watch this video by Hinge Health for a complete walkthrough of the dead bug exercise
Mistakes that Make the Dead Bug Less Effective
Small form errors turn this exercise from effective to pointless. Watch for these:
Letting the lower back lift off the floor. This means the core has switched off, or the range of motion is too big.
Pull the arm and leg in slightly until the back stays flat.
Rushing through reps. Speed shifts the work from muscle to momentum, and poor form slips by unnoticed.
Slow down and control both directions of the movement.
Holding your breath. This spikes tension in the wrong places and throws off stability. Letting the ribs flare upward. This tips the pelvis and cancels out the flat-back position the exercise depends on.
Keep the ribcage pulled down toward the hips throughout the movement
Recommended Sets and Reps for Dead Bug Exercise
Beginners can start with 2 to 3 sets of 8 to 10 reps per side. Focus on form, not speed.
As control improves, progress to 3 sets of 12 to 15 reps per side.
Add resistance or slow tempo before more reps. Rest 30-45 seconds between sets to let the core reset.
Track quality over quantity. A slow, clean set beats a fast, sloppy one every time.
If you can talk normally through a set, you’re likely ready to progress. If your form breaks down before the last few reps, drop back a level. Two to three sessions a week is enough to see steady gains.
You don’t need to train daily for this exercise to be effective.
Dead Bug vs Similar Core Exercises
Several core exercises target similar muscles, but each asks something different of your body.
| Exercise | Movement Type | Best For |
|---|---|---|
| Bird dog | Same pattern, face-down position | Building on all fours before floor work |
| Plank | Fully static hold | Endurance in a fixed position |
| Hollow hold | Static, legs and arms lifted | Raw core bracing strength |
| Russian twist | Rotational, seated | Targeting rotational power |
| Glute bridge | Hip-focused, floor-based | Posterior chain, not anti-rotation |
Primary, Secondary, and Stabilizers: Dead Bug Muscles Worked
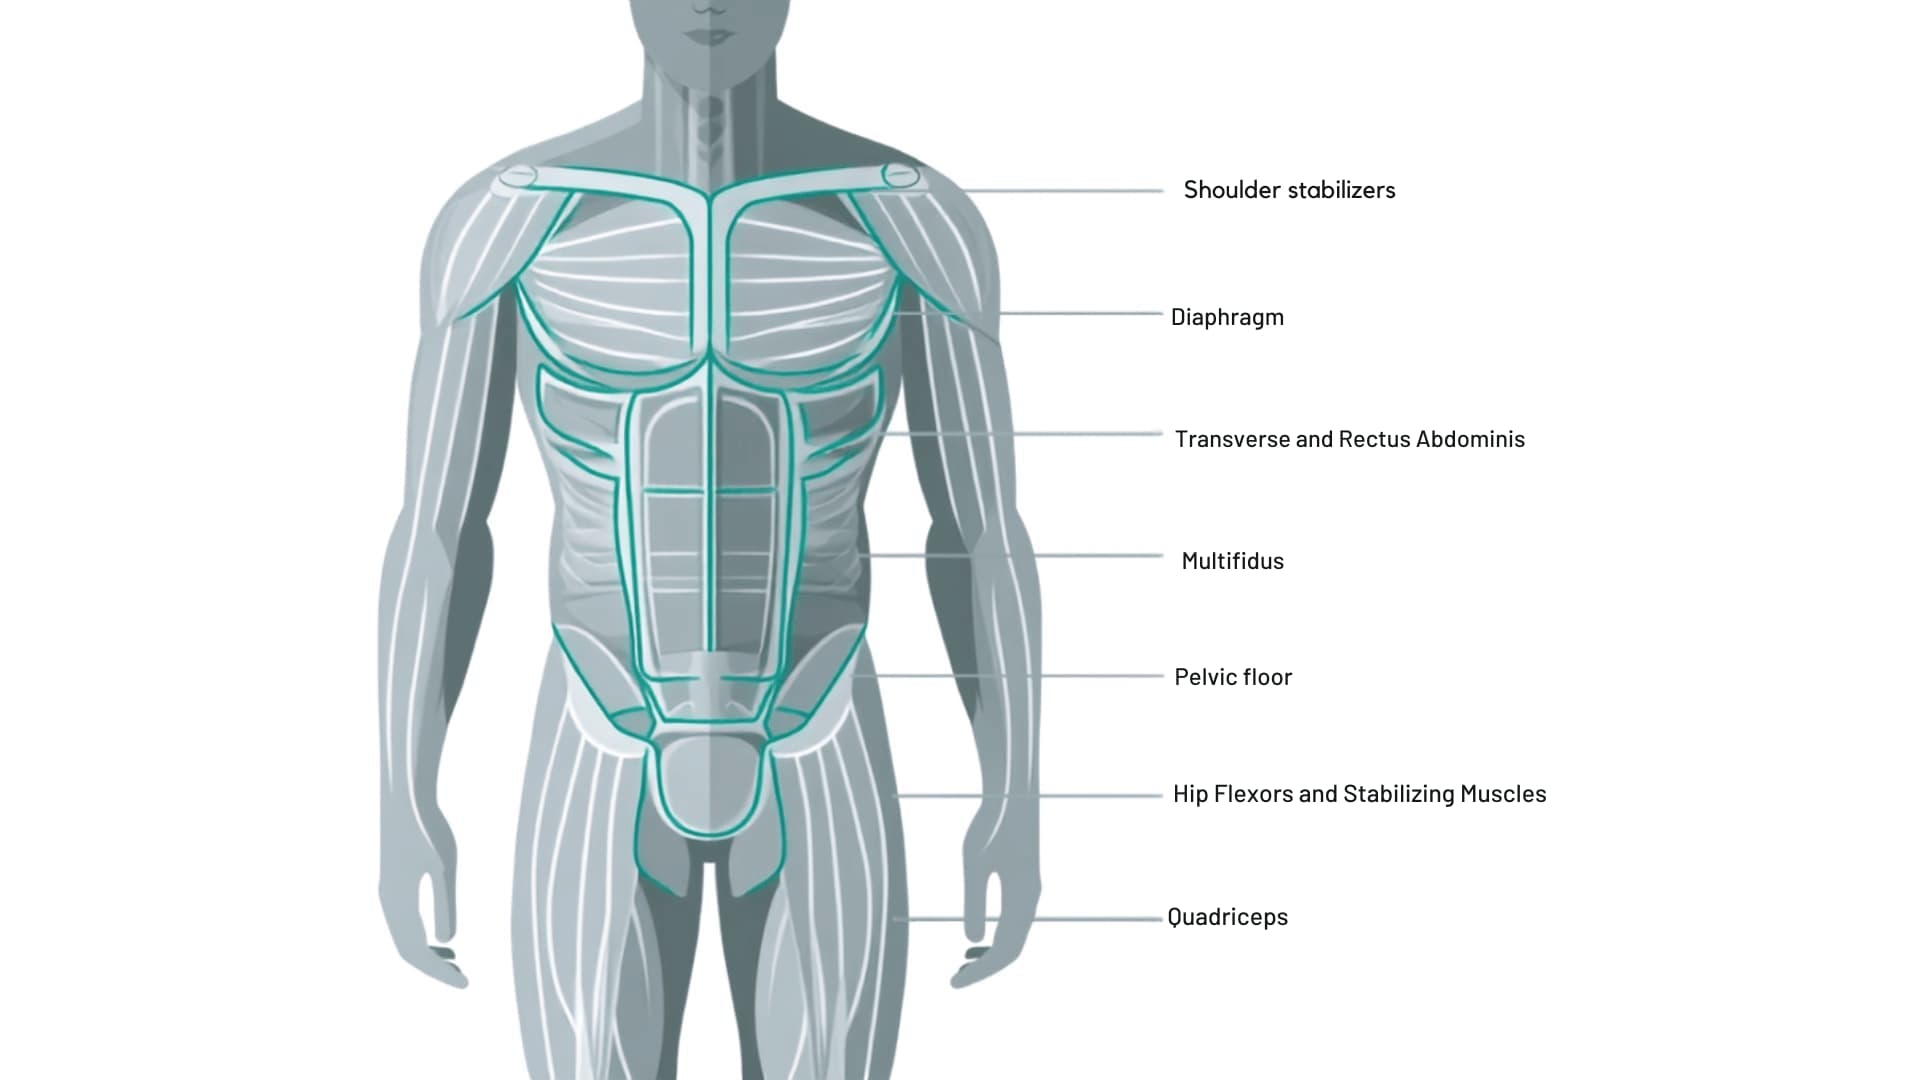
This exercise targets multiple muscles at once, offering an efficient workout despite its slow, controlled pace.
1. Diaphragm
Your diaphragm controls breathing, but it also acts as the roof of your core canister during the dead bug.
Steady exhales on extension keep intra-abdominal pressure balanced, which supports the spine from the inside out. Without this breathing control, the core loses part of its stability, even if the limbs move correctly.
This is why breath timing matters as much as limb positioning.
2. Pelvic floor
The pelvic floor forms the base of your core canister, working alongside the diaphragm and deep abdominals.
It helps manage internal pressure as your limbs extend, keeping the pelvis steady and level.
A weak or disengaged pelvic floor can show up as hip shifting or lower back strain during the movement.
This connection makes dead bug useful in postpartum and pelvic-health rehab programs.
3. Shoulder stabilizers
As your arm reaches overhead, small stabilizing muscles around the shoulder blade and rotator cuff keep the joint controlled throughout the movement.
This prevents the shoulder from shrugging up or the arm from wobbling off its path. Strengthening these stabilizers improves overhead control in daily tasks like reaching into a cabinet or lifting something above your head.
4. Quadriceps
The quadriceps control the leg as it straightens and lowers toward the floor.
They work with the hip flexors to manage the leg’s speed and angle, preventing it from dropping too fast.
This shared control between hip and thigh muscles is part of what makes the leg movement feel demanding, even without added weight.
5. Multifidus
The multifidus is a small, deep muscle running along the spine that supports each vertebra individually.
It fires to keep the spine steady as the limbs move independently.
Because it works below the larger back muscles, it’s easy to overlook, but it plays a key role in spinal control during any anti-extension exercise like the dead bug
6. Transverse and Rectus Abdominis
The transverse abdominis wraps around your spine like a corset. It’s the primary muscle worked here.
As your arm and leg extend, it contracts to keep your lower back flat and pelvis stable.
This deep bracing happens with every rep, whether you notice it or not. The rectus abdominis stabilizes your trunk during limb movement, building endurance without the spinal strain of crunches or sit-ups.
It’s a safer way to achieve visible core strength.
7. Hip Flexors and Stabilizing Muscles
As you lower your leg toward the floor, your hip flexors control the movement.
The surrounding stabilizing muscles, such as the glutes and lower back extensors, help keep your pelvis level.
This coordinated effort trains your body to stabilize the spine under limb movement, a skill that transfers directly to better performance in squats, running, and everyday bending or lifting tasks.
Dead Bug Variations
In addition to the basics, some less common variations alter the challenge in various ways.
| Variation | What It Changes | Why Try It |
|---|---|---|
| Heel taps | Legs move alone; arms stay still | Isolates lower-body control for beginners |
| Straight-leg dead bug | Legs stay fully extended, not bent | Longer lever increases core demand |
| Band around knees | Outward band tension on the knees | Adds hip and anti-rotation challenge |
| Medicine ball pass | Ball passed between hands and feet | Builds coordination and grip-core timing |
| Incline bench dead bug | Performed on a slight decline | Gravity pulls harder on the limbs |
Dead Bug Exercise Progressions: Beginner to Advanced
Difficulty builds in stages, not all at once. Here’s the natural progression path:
- Marching dead bug: only the legs move, arms stay locked overhead.
- Standard dead bug: full opposite arm-and-leg extension.
- Slow-tempo dead bug: same movement, held 2-3 seconds per rep.
- Extended-range dead bug: limbs lower closer to the floor.
- Loaded dead bug: light ankle or wrist weights added.
- Unstable-surface dead bug: performed on a soft mat or foam pad.
Dead Bug Exercise Benefits You May Notice Over Time
Results build gradually with consistent practice, not overnight.
Better posture often shows up first. A trained core holds the spine in better alignment throughout the day, not just during workouts. Fewer aches after long periods of sitting or standing follow soon after.
Breathing becomes more efficient; improved diaphragm control makes daily activities like climbing stairs less tiring.
Balance sharpens as the nervous system gets better at coordinating opposite limbs.
This shows up in small ways, like recovering faster from a stumble.
Over months, many notice improved performance in unrelated lifts as a stable core supports nearly all exercises.
How Many Dead Bugs Should You Do?
Volume depends on your goal and how the exercise fits into your session.
Using it as a warm-up? A short set is enough to activate the core before heavier lifts. Using it as your main core work? Plan for a few rounds spread across the week, not just one day.
Total weekly volume is more important than any single workout.
Aim for consistency over several sessions rather than cramming in extra reps at once.
Pay attention to recovery as well. If soreness lasts beyond a day or two, reduce your activity.
Who Should and Shouldn’t Do this Exercise
The dead bug exercise is safe for most, but it’s important to know who benefits most and who should be cautious.
| Should Try It | Should Be Cautious |
|---|---|
| Beginners starting core training | People with acute lower back injuries |
| Postpartum individuals rebuilding core strength | Those with recent abdominal surgery |
| People with mild lower back pain | Anyone with diagnosed diastasis recti without guidance |
| Older adults seeking low-impact exercise | People experiencing sharp pain during the movement |
| Athletes working on core stability | Those unable to keep lower back flat throughout |
As with any new exercise, check with a doctor or physical therapist if you have an existing injury or health condition.
Frequently Asked Questions
1. Is Dead Bug Good For Abs?
Yes, it targets your abs, especially the transverse and rectus abdominis, without straining your neck or spine.
2. How Many Dead Bugs Should I Do a Day?
Beginners can start with 2 to 3 sets of 8 to 10 reps per side, 3 to 4 times a week.
3. Does Dead Bug Work The Lower Back?
Not directly, but it strengthens deep core muscles that support and protect your lower back during movement.
4. Can Beginners Do Dead Bug Exercises?
Yes, it’s beginner-friendly, requires no equipment, and you can adjust the range of motion to your fitness level.
Wrapping It Up!
What is a dead bug exercise, at the end of the day? A simple pattern that quietly makes everything else easier.
Squats feel steadier. Deadlifts hold up better. Even carrying groceries stops nagging at the lower back.
None of that shows up overnight, so give it real weeks, not one workout. Pair it with a plank or a bird dog for variety, and let form lead every rep, not the rep count.
Avoid using shortcuts, and the results will appear automatically.